PROJECTS
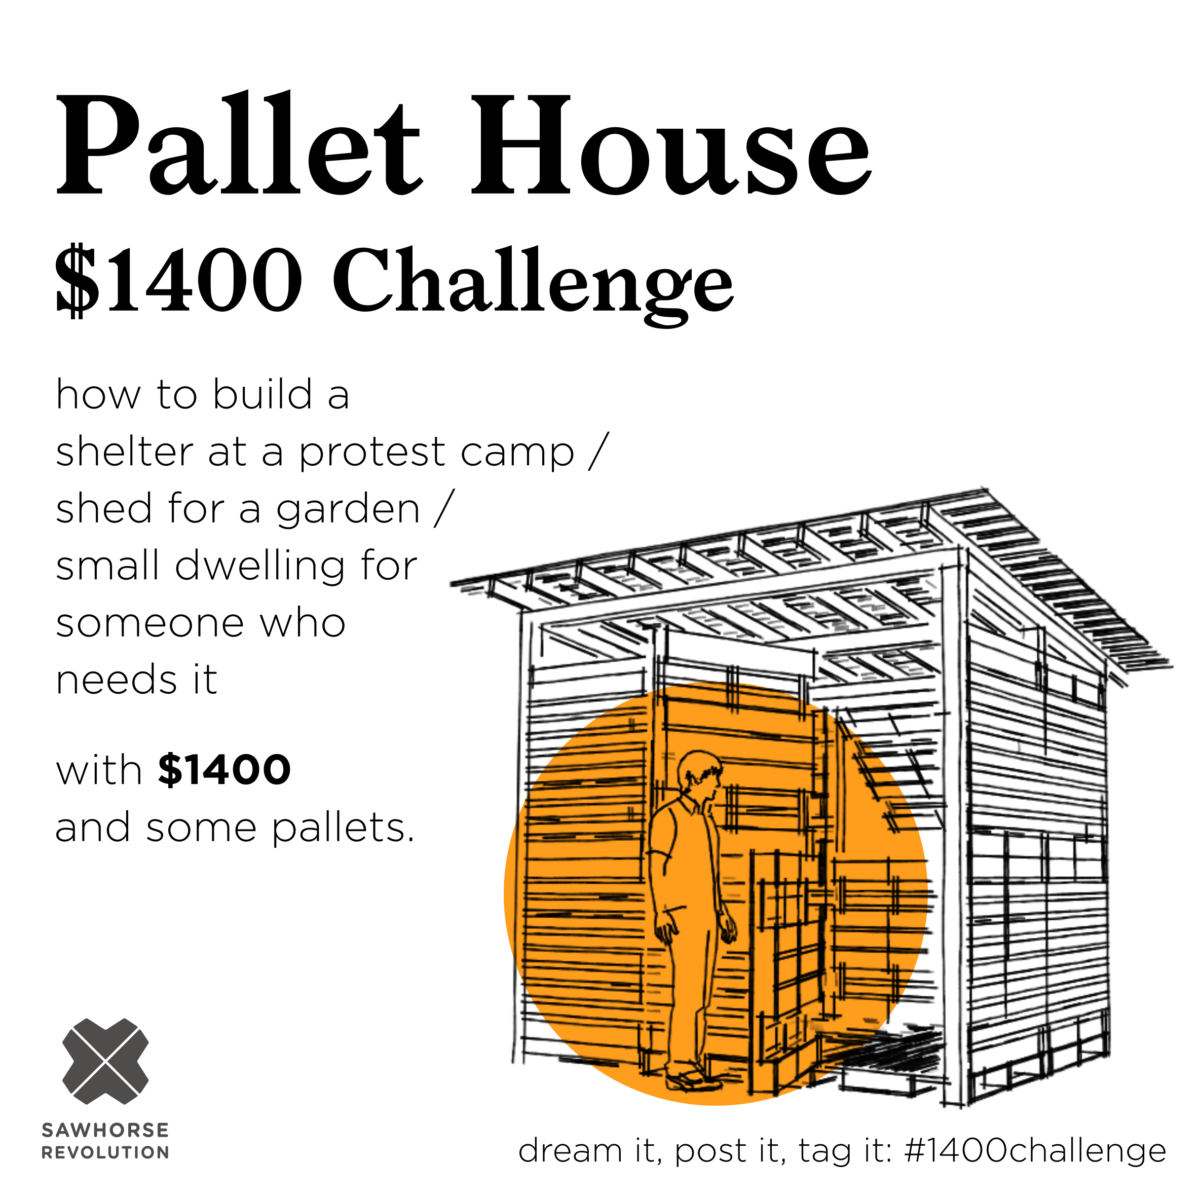


Pallet House
Sawhorse Revolution is proud to be part of the $1400 Challenge, a mutual aid project that outlines different ways you can build a more sustainable and self-sufficient community with your 2021 stimulus check.
Build a tiny home out of pallets and framing lumber – go on a pallet-finding scavenging mission and use the simplest power and hand tools. Protest camps, shelter for the houseless, a community garden shed covered with climbing roses…
NOTE: Sawhorse Revolution is not liable for any issues in construction or the design. Please reach out to us if you have questions about it during construction [email protected]
Materials:
Floor:
13 – 2x6x10 framing lumber for floor joists
2 – 2x6x16 framing lumber for long floor rim joists
120 square feet of strips of pallet wood for the subfloor
30 – 2×6 Simpson joist hangers
Teco nails – 2# – make sure they fit your joist hangers!
4 – Pier Blocks
Walls:
20 pallets
14 – 4x4x10 framing lumber
2 – 4x4x16 framing lumber
3’ deck screws – 5#box
Box of A35 Simpson brackets
More Teco nails (again make sure they fit the A35’s!)
6 – strong gate hinges
Clasp / lock of your design
1 – 4’x12’ Twinwall Polycarbonate panel – to cover the open transoms and the door and window palettes
Roof:
7 – 12’ 2×4 framing lumber
18 – 8’ 1×4 utility grade skip sheathing
2# 8d (8 penny) vinyl “sinkers” – hand-driven loose nails
7 – Suntuf Polycarbonate Corrugated Panels – color of your choosing, and consider using one transparent panel in the middle
Roofing Screws – 2#
Tools (visit your local tool library):
Impact driver with T25 star drive
Skil Saw with several blades
Miter Saw (if possible)
Tape Measure
Speed Square
Carpenter’s Pencil
Framing Hammer
Levels – 2’ and 4’
Pry Bar / Wonder Bar
Cat’s Paw
Nail puller or nips
Sawhorses
8′-10′ Ladder (a truck bed works in a pinch)
Siding possibilities (not included in cost):
Tarp, installed with battens to hold it down
Tyvek
Transparent Corrugated Polycarbonate
Grow plants up the structure!
Polycarbonate Twinwall (ideal because it’s insulating, but you’d need a second stimmy, as it’s $80 for a 4×8 sheet)
Tar paper and T1-11 or any other siding you choose
How to build…
Go on a pallet scavenging mission; you’ll need 20 or more…ideally all the same size.
Once you have your pallets, decide which side is the “front” and take off every other slat on the back of the pallets. Keep these – they’re your floor material.
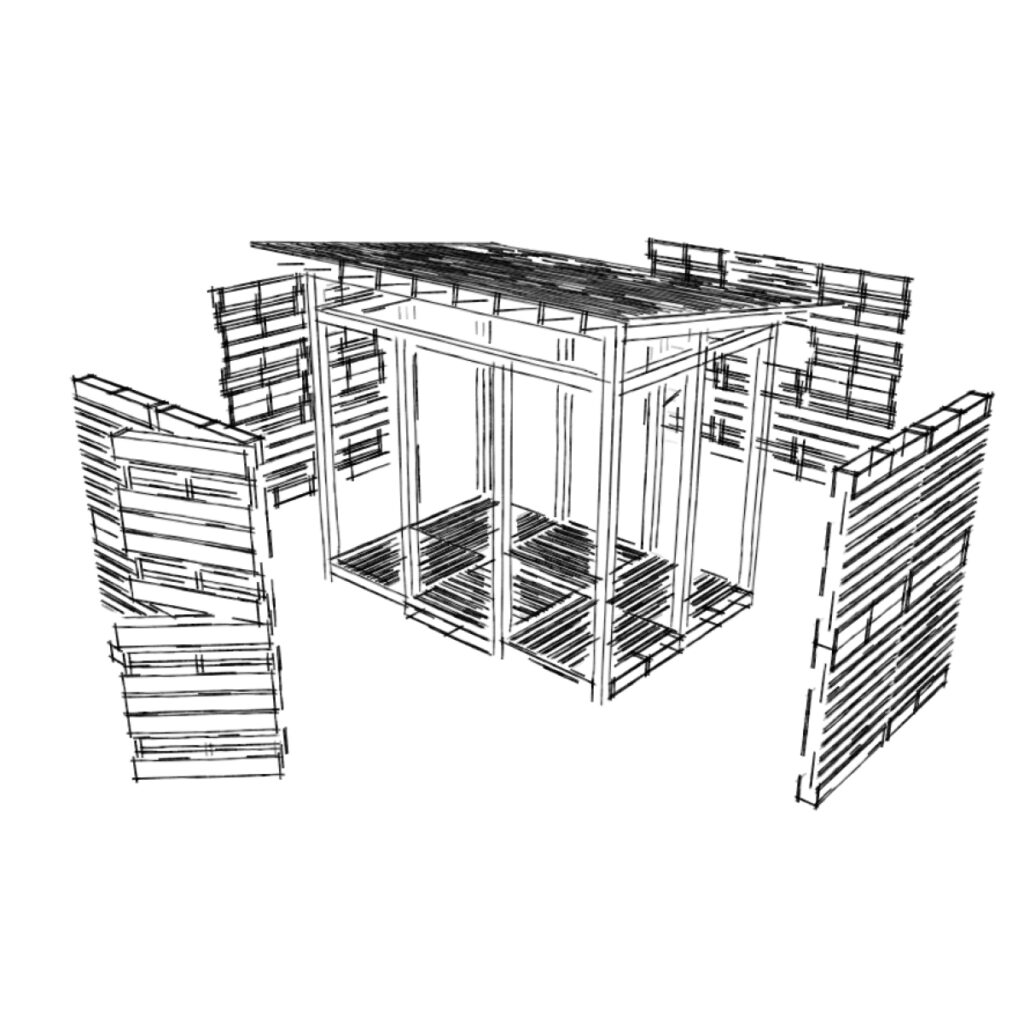
This pallet house is dimensioned according to whatever pallets you find. For the overall footprint, the house should be 2 pallets wide and 3 pallets long. Add 3-1/2” for every 4×4 post to get your length and width.
FLOOR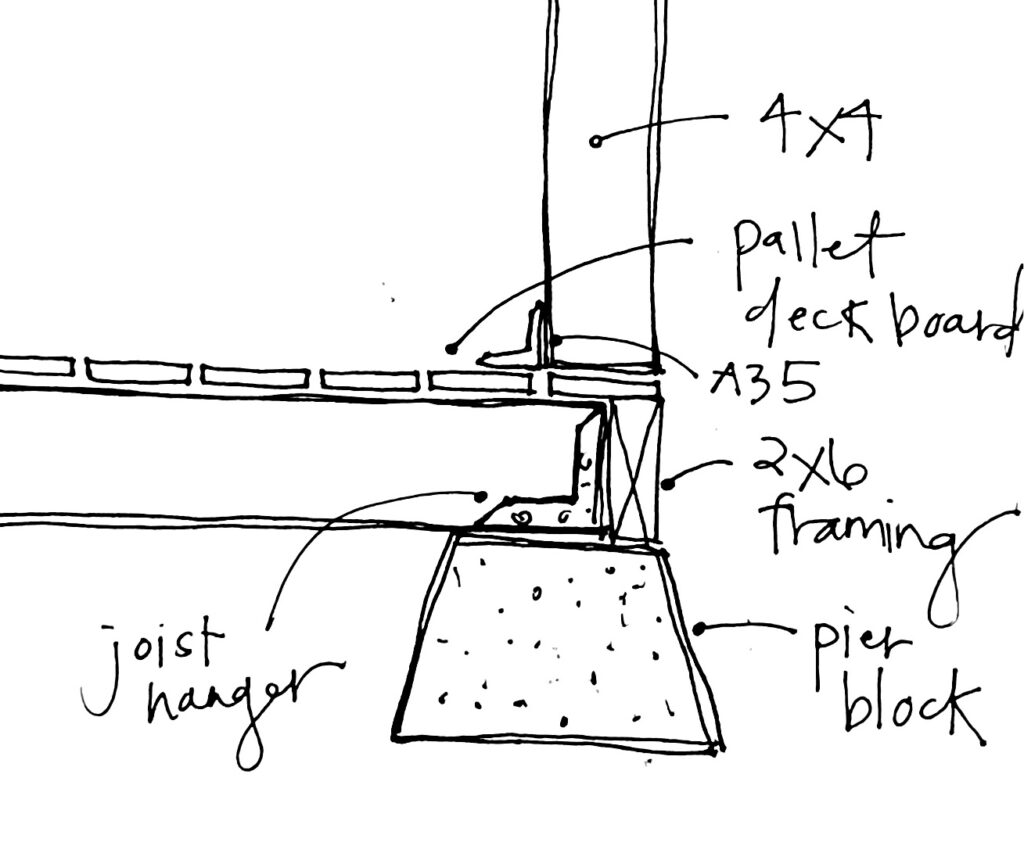
Build the floor first with the joists, short-way, 16” on center. Screw in the joists with a few decking screws, then square up the floor. The diagonal measurements corner to corner should be the same. Just bang a corner if it’s not working and re-measure. Then tack a diagonal brace on there. Finally, once it’s square and braced, you can add the simpson hangers. Install one side first tight with the floor joist. Then squeeze the other side flush with the joist and nail it in. Once the simpson hangers are on, the floor will stay nearly square.
Lift the floor onto pier blocks and level. Then, nail on each of the pallet slats you pulled off of your pallets to make the subfloor. Once you have about a 4’x8′ section nailed on, the floor should stay square and you can remove the brace. Sand or plane the floor if desired. You can also use 4×8 or 4×10 CDX plywood instead of pallet slats.
Walls
Figure out the overall height and shape of your structure, based on your pallet size, orientation, and the size of the windows you want around the top. You can draw it out on the ground to scale; you can use math; or you can “snap it out” with a chalk line. Once you have the angle of your roof, you can get started. Cut 10 of the 4×4’s with the same roof angle.
Then, begin by attaching one pallet to one post, flush to the bottom; screw at least 10 screws per side of each pallet into the 4×4 beams. Once you have one pallet/post assembled, add another post, and then attach to the floor with nails and screws – plumb up and brace until the roof has skip sheeting.
You can use A35 Simpson brackets installed with Teco nails for more strength. Then, continue around the structure according to the drawing. Toenail or screw the beams on to the posts. Add A35 brackets at regular intervals to increase the strength of the post and beam connections.
The door pallets should have fewer slats on to keep them lighter. And feel free to innovate; the design can be customized – lengthened, shortened, more windows…
Roof
The 2×4’s on the roof can be installed at 24” OC along the short end. Try to leave at least 8-10” of overhang on each end, with the end rafters flush with the outer edge of the short walls. Use A35’s again if more strength is desired. Then, install the skip sheathing perpendicular to the rafters at 16” OC or closer together; the 8d (8-penny) hand-sinker nails will work better than screws here. Leave overhang of 8-10” on the short sides using the skip sheeting to help support the roof. You can now remove the braces inside. Cut the corrugated roofing so that there is a 12” overhang on each side of the roof, and so that the roof drains over the short wall. Each roof panel should overlap 2 ridges.

Finishing
There should still be one sheet of twinwall polycarbonate. Cut it up with the circular saw and attach over the “window,” door, and the transom windows – the windows above the pallet walls and below the roof.
The tiny house can be adapted for many climates; consider growing plants up the side in a warmer climate for the most beautiful garden or tiny home. In an emergency or quick-turnaround protest situation, tarps, Tyvek, or whatever you can find nailed around the outside will go a long way to making the structure air-tight. Without siding, the house will last 2-5 years. Siding and a vapor barrier will significantly extend this timeline.
For insulation, you could wrap the outside of the structure in Rigid Foam, then install a vapor barrier, then install siding of your choice. If you choose to insulate, install rigid foam underneath the floor before installing the slats (aka the subfloor).
Special thanks to Sam Schultz for the drawings and Cullen Robertson for the construction advice <3